In this guide, we will show how to create Employees block using Block Builder addon. Of course, we will make every element editable.
Block will display basic information about company employees (name and surname, contact info etc.). For example, we could use it on Contact page. Go to the end of this page to check how final block will look like.
Block will consist of:
- two non-repeatable fields
- title,
- description
- set of repeatable fields describing each employee:
- name and surname,
- position
- phone
- photo
It's best to decide which fields to use, based on your html template.
Prepare html template + css
Before creating block, it is best to have/prepare html template and css first. This way we will only copy/paste parts of code generated by Block Builder into html template (or vice versa, if it suits you more).
Example html/css
                            <div class="employees-container">
    <h2 class="employees-title">Employees title</h2>
    <p class="employees-description">Lorem ipsum dolor sit amet.</p>
    <div class="employees">
        <!-- Repeatable element - start -->
        <div class="employee">
            <div class="employee-photo">
                <img src="https://unsplash.it/160/180" alt="Jacquelyn J. Smith"/>
            </div>
            <div class="employee-bio">
                <div class="employee-name">Jacquelyn J. Smith</div>
                <div class="employee-position">Community association manager</div>
                <div class="employee-entry employee-phone">
                    <i class="fa fa-phone"></i> <a href="tel:+19175585963">917-558-5963</a>
                </div>
                <div class="employee-entry employee-email">
                    <i class="fa fa-envelope"></i> <a href="mailto:[email protected]">[email protected]</a>
                </div>
            </div>
        </div>
        <!-- Repeatable element - end -->
    </div>
</div>
                            @media only screen and (min-width: 768px) {
    .employees {
        display: -webkit-box;
        display: -ms-flexbox;
        display: flex;
        -ms-flex-wrap: wrap;
        flex-wrap: wrap;
        margin-left: -5px;
        margin-right: -5px;
    }
}

/* Repeatable entry */
.employee {
    display: -webkit-box;
    display: -ms-flexbox;
    display: flex;
    background: #fff;
    border: 1px solid #e0e0e0;
    border-radius: 3px;
    margin-bottom: 10px;
    padding: 10px 15px 15px;
}
@media only screen and (min-width: 768px) {
    .employee {
        margin-left: 5px;
        margin-right: 5px;
        width: calc(50% - 10px);
    }
}
.employee-photo {
    -webkit-box-flex: 0;
    -ms-flex: 0 0 auto;
    flex: 0 0 auto;
    width: 50px;
    margin-right: 15px;
    position: relative;
    top: 5px;
}
@media only screen and (min-width: 414px) {
    .employee-photo {
        width: 80px;
    }
}
.employee-bio {
    -webkit-box-flex: 1;
    -ms-flex: 1;
    flex: 1;
    overflow: hidden;
}
.employee-name {
    font-size: 18px;
    font-weight: 500;
}
.employee-position {
    font-size: 13px;
    line-height: 13px;
    color: #aaa;
    margin-top: 5px;
}
.employee-position + div {
    margin-top: 10px;
}
.employee-entry {
    display: -webkit-box;
    display: -ms-flexbox;
    display: flex;
    -webkit-box-align: baseline;
    -ms-flex-align: baseline;
    align-items: baseline;
}
.employee-entry i {
    -webkit-box-flex: 0;
    -ms-flex: 0 0 auto;
    flex: 0 0 auto;
    width: 22px;
}
.employee-entry a {
    -webkit-box-flex: 1;
    -ms-flex: 1;
    flex: 1;
    overflow: hidden;
    text-overflow: ellipsis;
}
.employee-email i {
    font-size: 14px;
}
Let's start
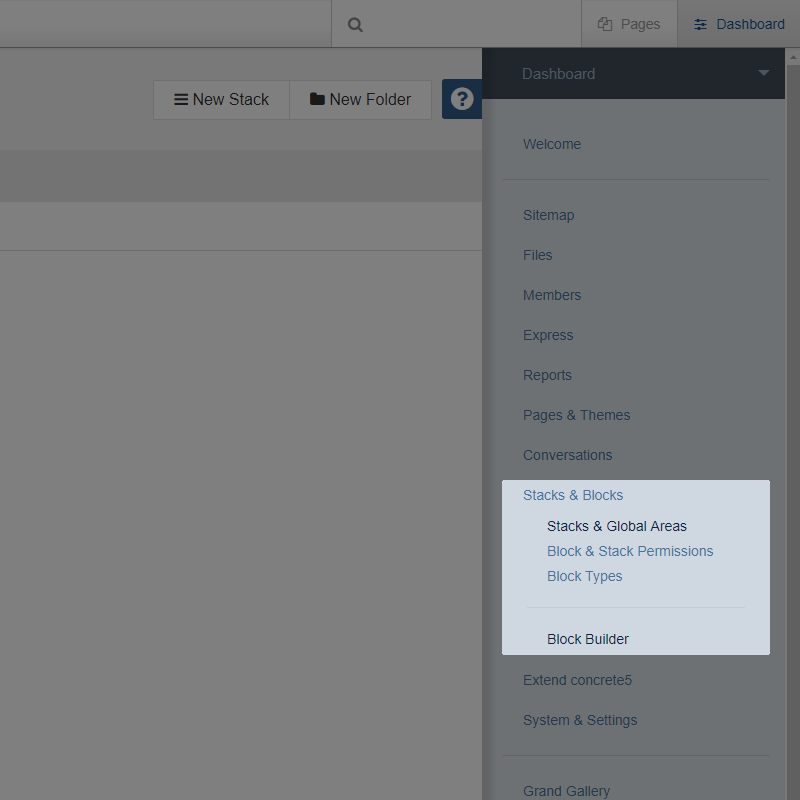
Login to your Concrete5 website and go to Stacks & Blocks/Block Builder.
Tab: Block settings
Fill required fields:
- Block name ->
Employees - Block handle ->
employees
Its good idea to add description (although it's not necessary)
- Block description ->
Display list of your employees (with contact info)
You can change other options if you wish, but for this block we don't need to do it.

Tab: Texts for translation
We can change few things here (but it's not necessary). Texts are very generic, so let's change some of them to something more appropriate:
Entries->EmployeesAdd at the top->Add employee at the topAdd at the bottom->Add employee at the bottom

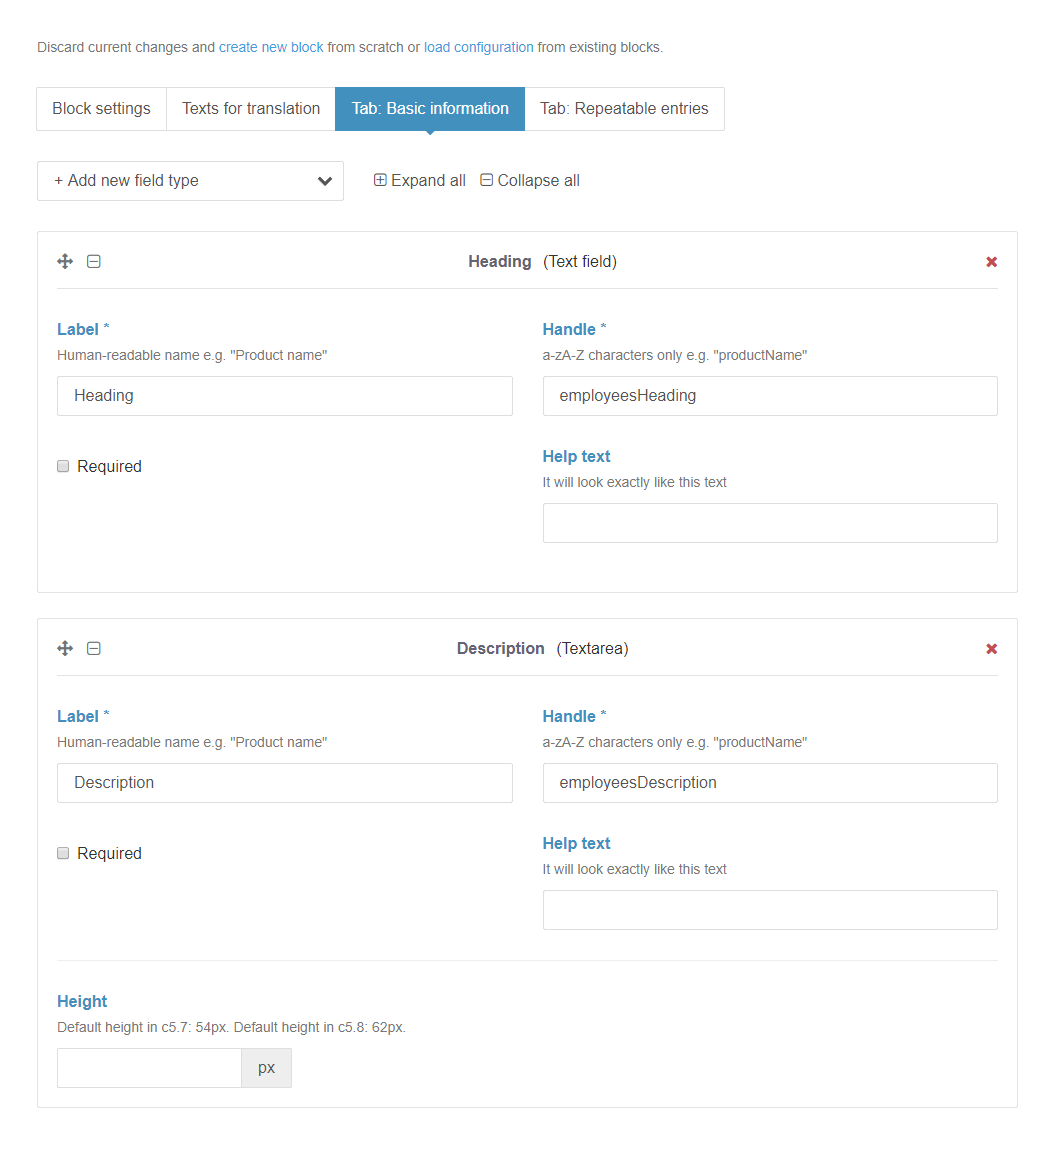
Tab: Basic information
In this tab, we are going to add title and description, which will be displayed above employee's list. Let's add fields listed below:
- for Heading select Text field
- Label ->
Heading - Handle ->
employeesHeading
- Label ->
- for Description select Textarea
- Label ->
Description - Handle ->
employeesDescription
- Label ->
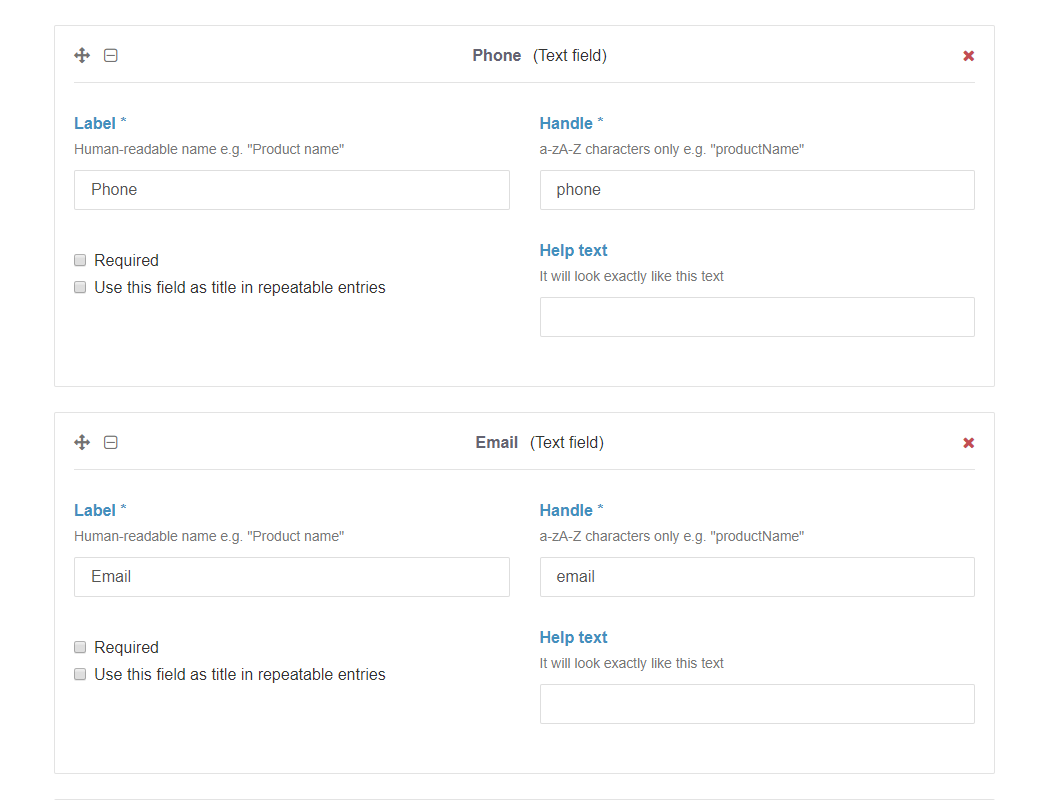
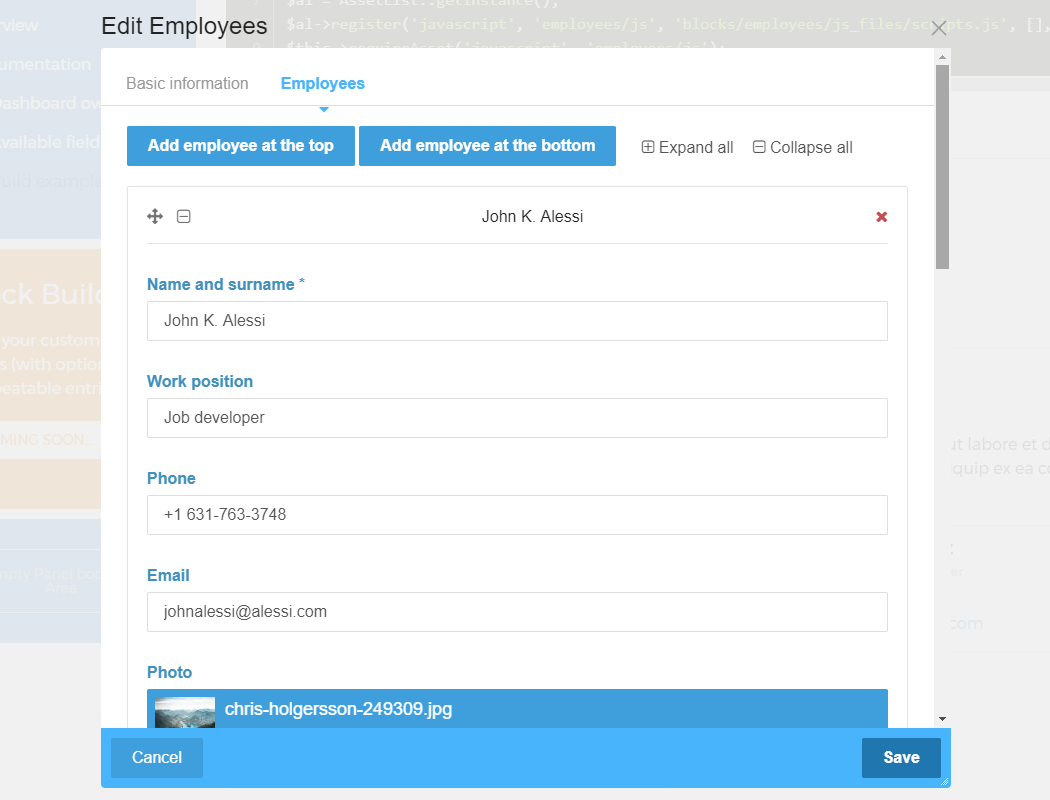
Tab: Repeatable entries
In this tab, we are going to add fields that describe each employee (name and surname, position, phone, email and photo):
- for Name and surname select Text field
- Label ->
Name and surname - Handle ->
nameAndSurname - additionally, check required and use it as title in repeatable entries
- Label ->
- for Position select Text field
- Label ->
Work position - Handle ->
workPosition
- Label ->
- for Phone select Text field
- Label ->
Phone - Handle ->
phone
- Label ->
- for Email select Text field
- Label ->
Email - Handle ->
email
- Label ->
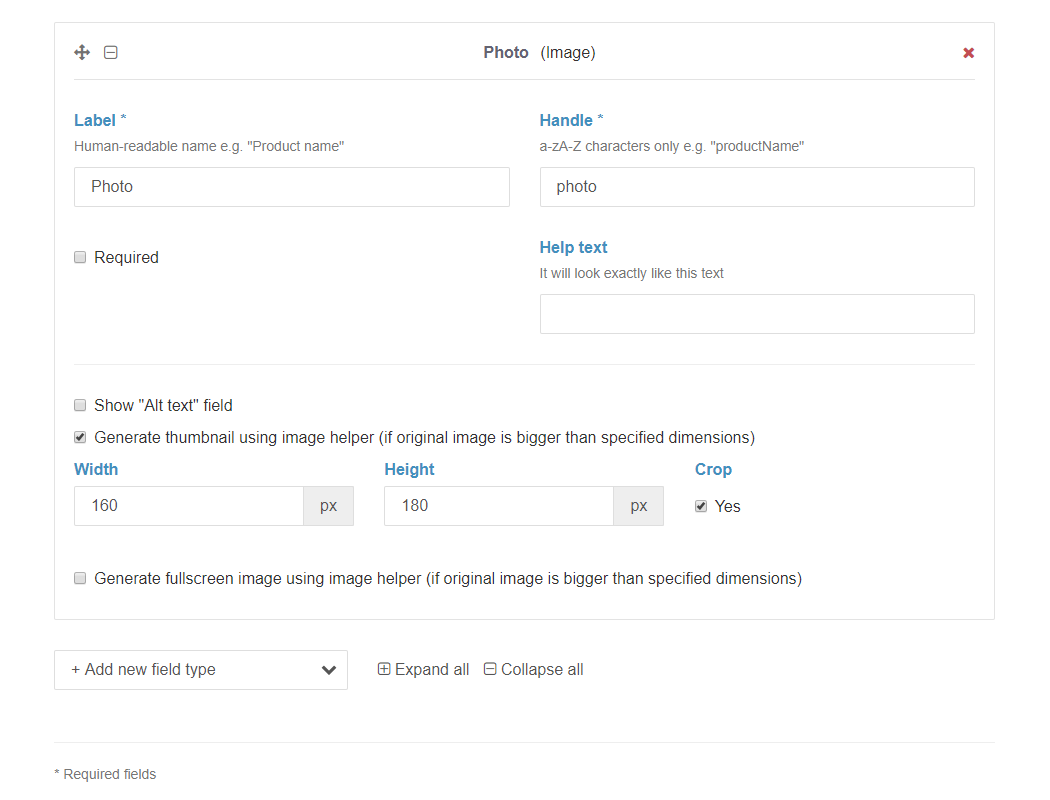
- and finally, for Photo select Image
- Label ->
Photo - Handle ->
photo - We can assume that user will be uploading large images, so we decide to generate thumbnails. We will set width to
160pxand height to180pxand use crop option. - we don't need fullscreen image, so we can uncheck this option.
- also, we don't need separate field for
altattribute, because we will usenameAndSurnamefor this purpose.
- Label ->

Create block
It's time to hit Build your block now! button.
You will find all generated files in application/blocks/employees directory.

Generated view.php file will look like this:
                            <?php defined('C5_EXECUTE') or die('Access Denied.'); ?>


<?php if (!empty($employeesHeading)): ?>
    <?php echo h($employeesHeading); ?>
<?php endif; ?>


<?php if (!empty($employeesDescription)): ?>
    <?php echo nl2br(h($employeesDescription)); ?>
<?php endif; ?>


<?php // Repeatable entries ?>

<?php if (count($entries)): ?>

    <?php foreach ($entries as $entry): ?>


        <?php if (!empty($entry['nameAndSurname'])): ?>
            <?php echo h($entry['nameAndSurname']); ?>
        <?php endif; ?>


        <?php if (!empty($entry['workPosition'])): ?>
            <?php echo h($entry['workPosition']); ?>
        <?php endif; ?>


        <?php if (!empty($entry['phone'])): ?>
            <?php echo h($entry['phone']); ?>
        <?php endif; ?>


        <?php if (!empty($entry['email'])): ?>
            <?php echo h($entry['email']); ?>
        <?php endif; ?>


        <?php if (!empty($entry['photo_link'])): ?>
            <?php // Original image ?>
            <img src="<?php echo $entry['photo_link']; ?>" alt="<?php echo h($entry['photo_alt']); ?>" width="<?php echo $entry['photo_width']; ?>" height="<?php echo $entry['photo_height']; ?>" />
        <?php endif; ?>

        <?php if (!empty($entry['photo_thumbnailLink'])): ?>
            <?php // Thumbnail image ?>
            <img src="<?php echo $entry['photo_thumbnailLink']; ?>" alt="<?php echo h($entry['photo_alt']); ?>" width="<?php echo $entry['photo_thumbnailWidth']; ?>" height="<?php echo $entry['photo_thumbnailHeight']; ?>" />
        <?php endif; ?>


    <?php endforeach; ?>

<?php endif; ?>
Customize view.php
Now, we need to copy/paste code generated by Block Builder into previously created html template (or vice versa, if it suits you more).
Wrap php variables with proper html code inside if statements. Remember that repeatable code should go into foreach loop.
Add tel: to phone href attribute and wrap it with regex function (it will delete every character besides numbers and +)
tel:<?php echo preg_replace('/[^+0-9]/', '', $entry['phone']); ?>
Add mailto: to email href attribute.
Only thing, that won't be needed, is link to original image. We can just delete that part of the code.
Also, if editor won't choose employee photo, we will display placeholder image.
Create 160 x 180px png image, name it employee-placeholder.png, and paste into application/blocks/employees/images
We haven't checked Show "Alt text" field earlier, so its good idea to replace:
alt="<?php echo h($entry['photo_alt']); ?>"
with
alt="<?php echo h($entry['nameAndSurname']); ?>"
This way alt attribute will be filled automatically with name and surname (which is required in our block, so we will never have that attribute empty).
                            <?php defined('C5_EXECUTE') or die('Access Denied.'); ?>

<div class="employees-container">

    <?php if (!empty($employeesHeading)): ?>
        <h2 class="employees-title"><?php echo h($employeesHeading); ?></h2>
    <?php endif; ?>

    <?php if (!empty($employeesDescription)): ?>
        <p class="employees-description"><?php echo nl2br(h($employeesDescription)); ?></p>
    <?php endif; ?>

    <?php // Repeatable entries ?>
    <?php if (count($entries)): ?>

        <div class="employees">

            <?php foreach ($entries as $entry): ?>

                <?php // Repeatable entry - start ?>

                <div class="employee">

                    <div class="employee-photo">

                        <?php if (!empty($entry['photo_thumbnailLink'])): ?>
                            <img src="<?php echo $entry['photo_thumbnailLink']; ?>" alt="<?php echo h($entry['photo_alt']); ?>" width="<?php echo $entry['photo_thumbnailWidth']; ?>" height="<?php echo $entry['photo_thumbnailHeight']; ?>" />
                        <?php else: ?>
                            <img src="<?php echo $this->getBlockUrl(); ?>/images/employee-placeholder.png" alt="<?php echo h($entry['nameAndSurname']); ?>" width="160" height="180" />
                        <?php endif; ?>

                    </div>

                    <div class="employee-bio">

                        <?php if (!empty($entry['nameAndSurname'])): ?>
                            <div class="employee-name"><?php echo h($entry['nameAndSurname']); ?></div>
                        <?php endif; ?>

                        <?php if (!empty($entry['workPosition'])): ?>
                            <div class="employee-position"><?php echo h($entry['workPosition']); ?></div>
                        <?php endif; ?>

                        <?php if (!empty($entry['phone'])): ?>
                            <div class="employee-entry employee-phone">
                                <i class="fa fa-phone"></i> <a href="tel:<?php echo preg_replace('/[^+0-9]/', '', $entry['phone']); ?>"><?php echo h($entry['phone']); ?></a>
                            </div>
                        <?php endif; ?>

                        <?php if (!empty($entry['email'])): ?>
                            <div class="employee-entry employee-email">
                                <i class="fa fa-envelope"></i> <a href="mailto:<?php echo h($entry['email']); ?>"><?php echo h($entry['email']); ?></a>
                            </div>
                        <?php endif; ?>

                    </div>
                </div>

                <?php // Repeatable entry - end ?>

            <?php endforeach; ?>

        </div>

    <?php endif; ?>

</div>
Add css/js files
We advise to add css (or scss/less) and js files somewhere inside your theme folder. But if you want, you can add those in your block.
- Create file styles.css in application/blocks/employees/css_files and paste css code there
- Open application/blocks/employees/controller.php, find
view()method and paste code below:
                            // Load css file
$al = AssetList::getInstance();
$al->register('css', 'employees/css', 'blocks/employees/css_files/styles.css', [], false);
$this->requireAsset('css', 'employees/css');

// Load js file (don't use it, I left it here as example)
$al = AssetList::getInstance();
$al->register('javascript', 'employees/js', 'blocks/employees/js_files/scripts.js', [], false);
$this->requireAsset('javascript', 'employees/js');
Final result
Below we have added "Employees" block.
You can download working block from this guide here.
Our team
Lorem ipsum dolor sit amet, consectetur adipiscing elit, sed do eiusmod tempor incididunt ut labore et dolore magna aliqua. Ut enim ad minim veniam, quis nostrud exercitation ullamco laboris nisi ut aliquip ex ea commodo consequat.

